 Newshot
文章标题:用 Vouched KYA 在 Next.js 中检测 AI 智能体
正文: 像 ChatGPT、Claude 和 Perplexity 这样的 AI 智能体已经在代替真人浏览网站了,而我们大多数网站无法把它们与人类或爬虫区分开来。但好消息是,我们可以解决这个问题!在这篇文章中,我们将在大约 5 分钟内,免费把 Vouched KYA 的 Detect 添加到 Next.js 应用中。
更想看视频?这里有视频演示。
什么是 Know Your Agent 和 Detect?
你可能听说过 KYC(Know Your Customer,了解你的客户)。Know Your Agent(KYA)是智能体时代的同一理念:知道哪些 AI 智能体在与我们的业务交互,以及是哪个真人授权了它们。Vouched 在 KYA-OS 上构建了 Vouched KYA,KYA-OS 是一个它已捐赠给 Decentralized Identity Foundation 的开放标准。
Vouched Detect 会把到达我们服务器的每个请求分类为 human、ai_agent、bot 或 incomplete_data。在 Next.js 中,我们就在应用的 Proxy 里运行 Vouched 的检测引擎,每个请求只增加几毫秒。而且——最棒的部分——Detect 有免费套餐,无需信用卡。Vouched KYA 的付费方案增加了 Enforce 和 Govern,让我们可以对智能体应用策略并验证是谁授权了它们。(我们将在后续文章中介绍这些!)
代码
你可以在这里找到完整的代码示例:https://github.com/vouched/KnowYourAgentWebsite-Nextjs-Sample
前提条件
- 一个 Next.js 16 应用,使用 App Router 或 Pages Router
- Node.js 22.12 或更高版本
- 一个免费的 Vouched KYA 账户,包含一个项目和一个 API key(以 sk_ 开头)。
1. 添加 npm 包
npm install @kya-os/checkpoint-nextjs
2. 存储我们的 API Key(安全地!)
我们的 API key 是机密,因此绝不应该提交到源代码管理中。Next.js 会从 .env.local 加载环境变量,而 create-next-app 生成的 .gitignore 已经忽略了它。一定要再检查一下你的 .gitignore;未来的你会感谢你 💯。
在我们项目的根目录下,创建 .env.local:
CHECKPOINT_API_KEY=<your api key>
当我们部署到生产环境时,一定要在我们的托管平台(比如 Vercel)中设置相同的环境变量。
3. 将 Vouched KYA 添加到 proxy.ts
Next.js 会在每个请求之前运行 proxy.ts,这使它成为 Detect 的完美位置。在我们项目的根目录下创建 proxy.ts,如果我们的应用使用了 src/ 目录,则创建在 src/ 中:
        import { withCheckpoint } from "@kya-os/checkpoint-nextjs";

export default withCheckpoint({
  // Reports every request to our Vouched KYA dashboard
  apiKey: process.env.CHECKPOINT_API_KEY,

// Observe mode: classify and report every request, but don't block them
  enforcementMode: "observe",
});

export const config = {
  // Run on every page, skipping Next.js' static files
  matcher: ["/((?!_next/static|_next/image|favicon.ico).*)"],
};
就这样!只需一次函数调用,我们就运行起来了。
withCheckpoint 默认会执行策略,所以在这个示例中,我们显式开启了 observe 模式。而如果我们忘了 API key,我们的应用仍然可以工作;只是 SDK 无法向我们的仪表盘报告。
4. 运行应用
我们的网站看起来完全一样,这正是重点。
5. 模拟智能体 + 机器人流量
现在让我们假装自己是 ChatGPT。
在第二个终端中(在 Windows PowerShell 上,输入 curl.exe 而不是 curl):
curl -I -A "Mozilla/5.0 AppleWebKit/537.36 (KHTML, like Gecko); compatible; ChatGPT-User/1.0; +https://openai.com/bot" http://localhost:3000/
在响应头中,我们会找到这些:
        HTTP/1.1 200 OK
x-checkpoint-mode: observe
x-checkpoint-would-have-been: Permit
成功了!Detect 正在 observe 模式下运行,而 Permit 是它在执行策略时本会采取的动作。在一分钟内,我们的请求会出现在 Vouched KYA 仪表盘的 Detect → Activity 下,显示为一个名为 ChatGPT 的 ai_agent。🎉 没看到它?在 withCheckpoint 中添加 debug: true,SDK 就会记录报告未能到达 Vouched 的原因,比如 API key 拼写错误。
接下来,试试 OpenAI 的 GPTBot user agent:
curl -I -A "Mozilla/5.0 AppleWebKit/537.36 (KHTML, like Gecko); compatible; GPTBot/1.4; +https://openai.com/gptbot" http://localhost:3000/
仪表盘将其标记为机器人,因为它是收集训练数据的爬虫,而不是代表个人浏览的 AI 助手。
6. 在代码中记录
SDK 在对每个请求进行分类后会调用 onResult,这是记录结果、发送到我们的分析系统或保存到数据库的理想位置。让我们把它添加到 proxy.ts 中:
        export default withCheckpoint({
  apiKey: process.env.CHECKPOINT_API_KEY,
  enforcementMode: "observe",

// Runs after Vouched KYA classifies each request
  onResult: (result, request) => {
    const { detectionClass, detectedAgent, confidence } = result.detectionDetail;
    console.log(
      `${request.nextUrl.pathname}: ${detectionClass.type} ${detectedAgent?.name ?? ""} (${Math.round(confidence)}%)`,
    );
  },
});
再次发送 ChatGPT 和 GPTBot 请求,再加上普通的 curl -I http://localhost:3000/,我们的终端显示:
        /: AiAgent ChatGPT (100%)
/: Bot GPTBot (100%)
/: Bot Dev Tools (100%)
Vouched KYA 甚至知道 curl 是开发者工具!需要注意一点:SDK 会等待 onResult 完成后才响应,因此对于耗时操作,请使用 after() 在响应发送后运行。
附加内容:对我们的代理进行单元测试
由于引擎运行在我们的应用内部,我们可以用任意用户代理对 proxy.ts 进行单元测试,无需网络。示例中的 Vitest 测试正是这样做的,通过辅助函数模拟 Vouched 的 API,这样我们的 CI 就能捕获任何 @kya-os/checkpoint-nextjs 更新中改变流量分类方式的变更。
结论
AI 代理已经在访问我们的网站了,而使用 @kya-os/checkpoint-nextjs,只需一次函数调用(且零成本)就能开始看到它们。
完整示例实现了本文中的所有内容,外加一个有趣的额外功能:将你的 Project ID 和 API key 粘贴到页面中,点击发送模拟流量,然后观看 ChatGPT、Claude、Perplexity、GPTBot 等出现在你的仪表盘中!
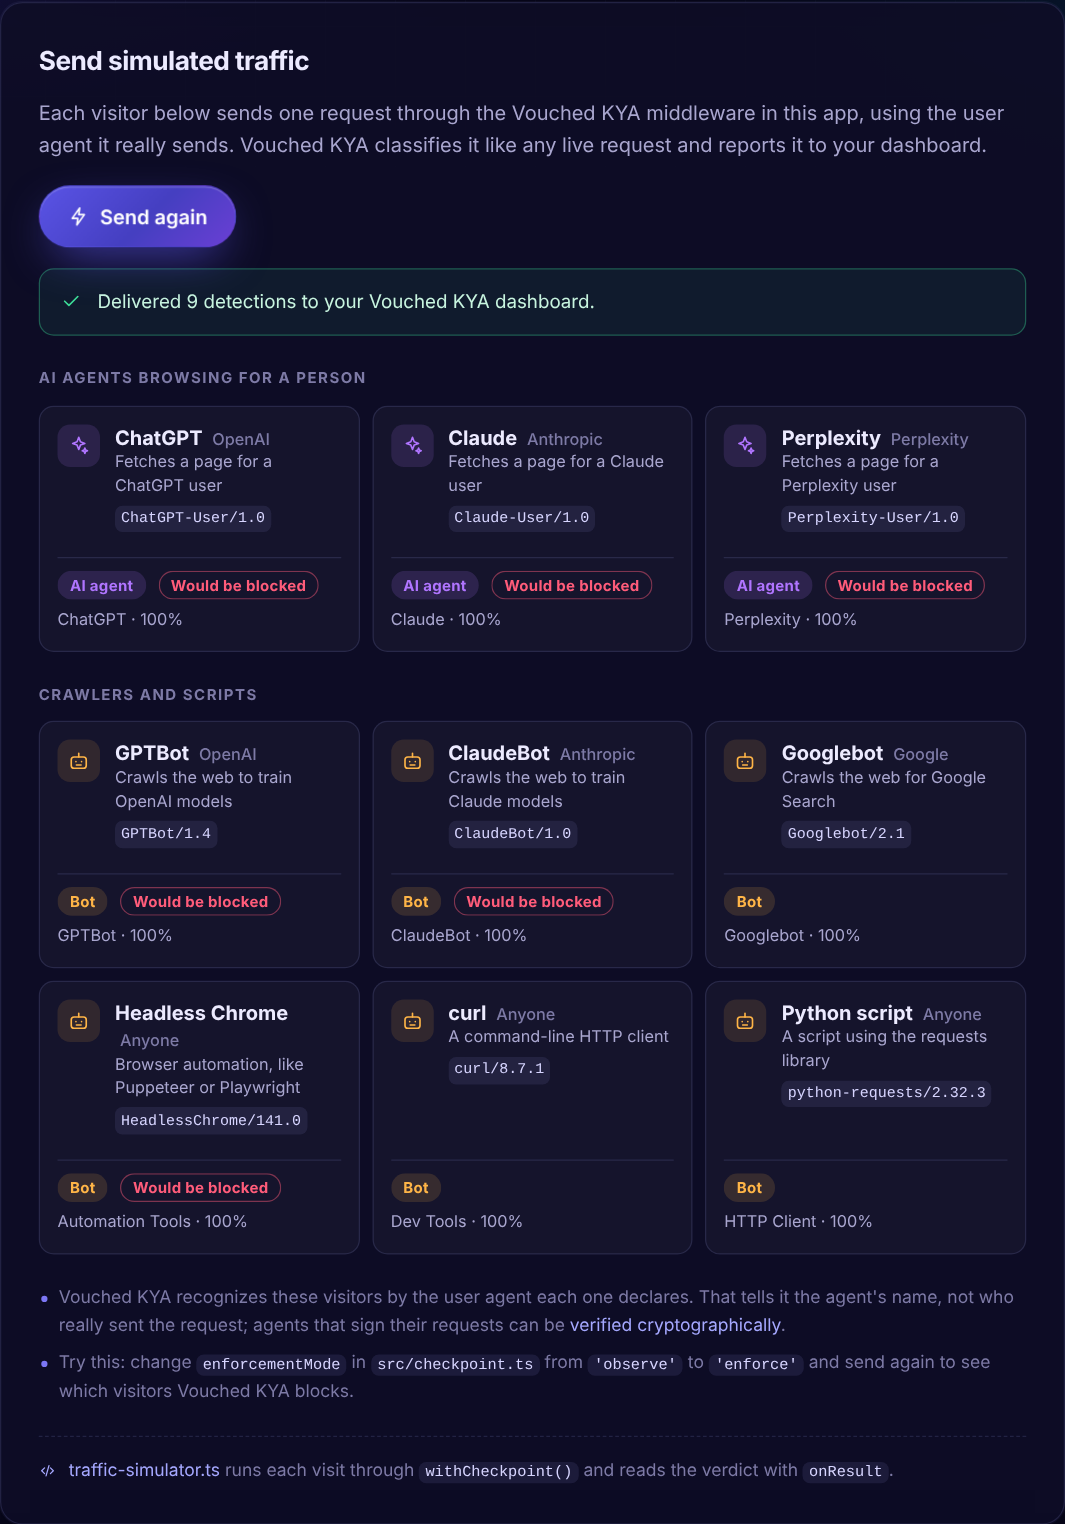
为什么显示"Would be blocked"?示例中添加了 engineConfig: { tier3Action: "block" },这会告诉 Vouched KYA 阻止已知的 AI 代理、AI 爬虫和无头浏览器。我们的 proxy.ts 没有包含这一项,这就是 ChatGPT 获得 Permit 的原因。在 observe 模式下,无论哪种方式都不会被阻止。
改用 .NET 构建?查看 Blazor Server 示例。
接下来,我们将从观察转向使用 Enforce 进行强制执行。在 Vouched KYA 首页底部订阅 Vouched KYA 新闻通讯,以免错过!